
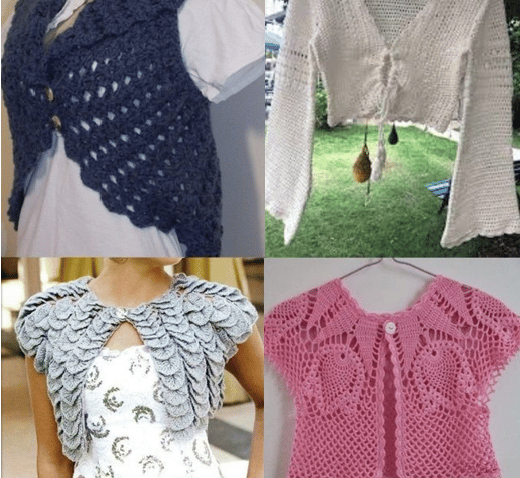
Within the current fashion, there is a high tendency to incorporate handmade pieces into the looks. These pieces give a special touch to the composition depending on the desired proposal. Crochet shrug, for example, is a great option for those in love with a more romantic style.
There is even a discussion about shrug and vests being similar pieces. However, the big difference is in the size and format of the two pieces. While the vest is longer and is mainly used open, the shrug is shorter and used both open and closed.
Know that crochet shrug is a very interesting piece of work. This because it is quick to do and very delicate. Besides, its way of doing tends to be simple, which allows you to create many other pieces and vary even more the options of looks.
Tutorial to make crochet shrug
For you to make a crochet shrug, we will present a tutorial that is simple, quick, and easily adaptable to the size you want. Therefore, to increase it or decrease it you have to change the number of squares to complete the piece.
Required materials
Know that the number of threads must vary according to the size of the piece. However, the dimension of the model here presented spends 1 crochet ball of thread. Besides, you will need a crochet hook -D and scissors.
The necessary stitches for the production of this piece are:
- chain stitch;
- single crochet;
- double crochet;
- double treble crochet;
- the picot stitch, which corresponds to the finishing nozzles: 1 slip stitch, 3 chains, and 1 slip stitch in the same space.
Way of doing
The work consists of 2 different patterns, the first being the complete square which will be responsible for most of the piece. The second pattern corresponds to a triangle which will be responsible for closing the front with the back.
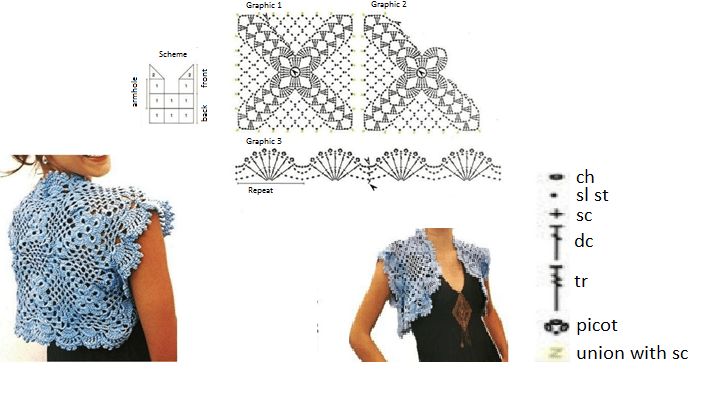
Note that for reading the chart it is necessary to pay attention to the minis arrows. Know that the leaked arrows show the beginning of the work, while the filled arrows show the end. The letter “z” shows the places where you will join the square and the triangle produced with the single crochets.
Always start at the center and after finishing assembling the shrug, do the border all over the piece. Work with the dedication to reproduce this beautiful model. Thus, in the end, you will have a beautiful crochet shrug made with all the love you deserve.
