
The passionate ones with crochet know that a good piece can change the whole decoration. This would not be different in the bathroom of our homes. Therefore, the creation of crochet rugs for the bathroom can make a big difference.
In fact, every crochet piece can bring beauty, coziness, and affection. This is because the person who does this type of work puts not only their knowledge but also their love in the way of doing.
Meet different types of crochet rugs for bathroom
When we talk about crochet rugs for the bathroom, we have numerous possibilities of models, patterns, and functions. For example, you should already have seen kits with a rug for the bathroom door, close to the toilet vessel, and toilet lid.
The function of each is at the same time different and similar. All of them are suitable to protect the bathroom from splashes and make you more comfortable to get out of the bathtub and not step on the ice floor. In addition, they have the function of decorating.
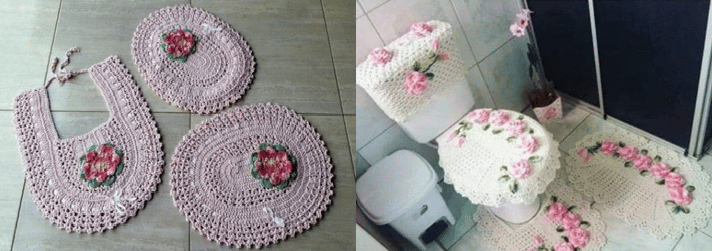
To make a beautiful bathroom rug, we brought several beautiful models to inspire you. Look at these beautiful rugs with varied and colorful flower applications:
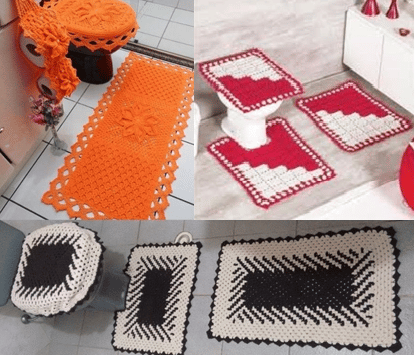
Rectangular rugs leave nothing to be desired concerning the most sophisticated pieces:
However, if you like more fun pieces, bet on an owl or butterfly rug can be great:
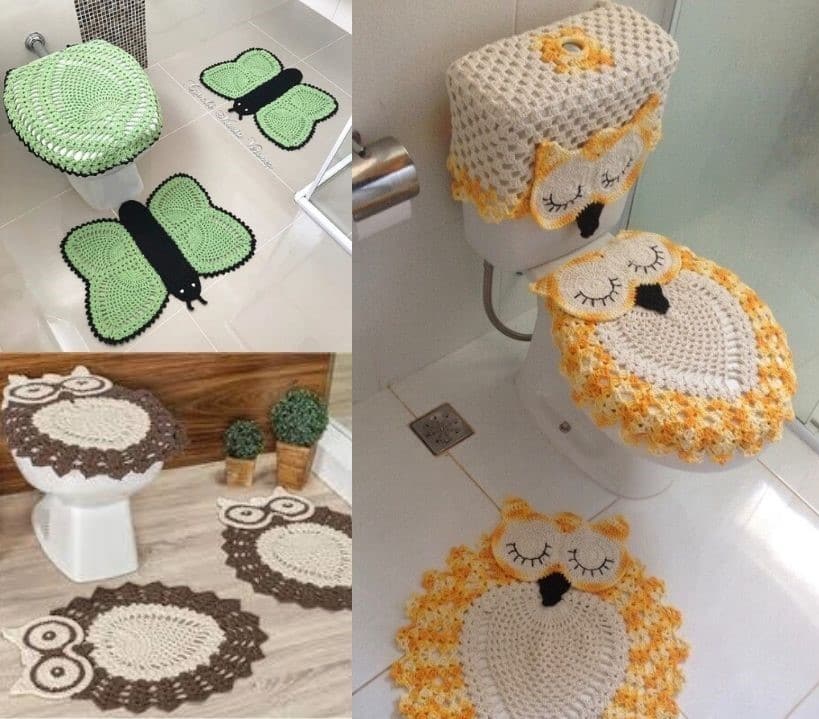
Owl Tutorial rug
Body.
With MC:
Ch 10 join with sl st to form ring.
1: ch 3, 2 dc, ch 2, 3 dc, ch 5, 3 dc, ch 2, 3 dc
(there should be a small gap in the ring. this is ok and will be needed later for outer rounds)
2: ch 3, 3 dc in ch 2 sp, ch 2, 3 dc in same ch 2 sp, 13 dc in ch 5 sp, 3 dc in ch 2 sp, ch 2, 3 dc in same ch 2 sp; turn.
(don’t connect to previous row, this creates the ‘scalloping’ edge on the pineapple later)
3: ch 3, 3 dc in ch 2 sp, ch 2, 3 dc in same ch 2 sp, 1 dc in ea dc (13 dc), 3 dc in ch 2 sp, ch 2, 3 dc in same ch 2 sp; turn.
4: ch 3, 3 dc in ch 2 sp, ch 2, 3 dc in same ch 2 sp, ch 1, (dc, ch 1) x13, 3 dc in ch 2 sp, ch 2, 3 dc in same ch 2 sp; turn.
5: ch 3, 3 dc in ch 2 sp, ch 2, 3 dc in same ch 2 sp, ch 3, (1 sc in dc, ch 3)x13, 3 dc in ch 2 sp, ch 2, 3 dc in same ch 2 sp; turn.
6: ch 3, 3 dc in ch 2 sp, ch 2, 3 dc in same ch 2 sp, ch 3, (1 sc in ch 3 sp, ch 3)x12, 3 dc in ch 2 sp, ch 2, 3 dc in same ch 2 sp; turn.
7: ch 3, 3 dc in ch 2 sp, ch 2, 3 dc in same ch 2 sp, ch 3, (1 sc in ch 3 sp, ch 3)x11, 3 dc in ch 2 sp, ch 2, 3 dc in same ch 2 sp; turn.
8: ch 3, 3 dc in ch 2 sp, ch 2, 3 dc in same ch 2 sp, ch 3, (1 sc in ch 3 sp, ch 3)x10, 3 dc in ch 2 sp, ch 2, 3 dc in same ch 2 sp; turn.
9: ch 3, 3 dc in ch 2 sp, ch 2, 3 dc in same ch 2 sp, ch 3, (1 sc in ch 3 sp, ch 3)x9, 3 dc in ch 2 sp, ch 2, 3 dc in same ch 2 sp; turn.
10: ch 3, 3 dc in ch 2 sp, ch 2, 3 dc in same ch 2 sp, ch 3, (1 sc in ch 3 sp, ch 3)x8, 3 dc in ch 2 sp, ch 2, 3 dc in same ch 2 sp; turn.
11: ch 3, 3 dc in ch 2 sp, ch 2, 3 dc in same ch 2 sp, ch 3, (1 sc in ch 3 sp, ch 3)x7, 3 dc in ch 2 sp, ch 2, 3 dc in same ch 2 sp; turn.
12: ch 3, 3 dc in ch 2 sp, ch 2, 3 dc in same ch 2 sp, ch 3, (1 sc in ch 3 sp, ch 3)x6, 3 dc in ch 2 sp, ch 2, 3 dc in same ch 2 sp; turn.
13: ch 3, 3 dc in ch 2 sp, ch 2, 3 dc in same ch 2 sp, ch 3, (1 sc in ch 3 sp, ch 3)x5, 3 dc in ch 2 sp, ch 2, 3 dc in same ch 2 sp; turn.
14: ch 3, 3 dc in ch 2 sp, ch 2, 3 dc in same ch 2 sp, ch 3, (1 sc in ch 3 sp, ch 3)x4, 3 dc in ch 2 sp, ch 2, 3 dc in same ch 2 sp; turn.
15: ch 3, 3 dc in ch 2 sp, ch 2, 3 dc in same ch 2 sp, ch 3, (1 sc in ch 3 sp, ch 3)x3, 3 dc in ch 2 sp, ch 2, 3 dc in same ch 2 sp; turn.
16: ch 3, 3 dc in ch 2 sp, ch 2, 3 dc in same ch 2 sp, ch 3, (1 sc in ch 3 sp, ch 3)x2, 3 dc in ch 2 sp, ch 2, 3 dc in same ch 2 sp; turn.
17: ch 3, 3 dc in ch 2 sp, ch 2, 3 dc in same ch 2 sp, ch 5, 1 sc in ch 3 sp, ch 5, 3 dc in ch 2 sp, ch 2, 3 dc in same ch 2 sp; turn.
18: ch 3, 3 dc in ch 2 sp, ch 2, 3 dc in same ch 2 sp, 3 dc in ch 2 sp, ch 2, 3 dc in ch 2 sp. Bind Off.
With C2 start at bottom in starting ring.
Rnd 1: ch 3, 2 dc, ch 2 3 dc, *3 dc, ch 2, 3dc in ch 3 sp that started each row* repeat *’d section around pineapple. (19 ‘fans’ total)
Rnd 2: sl st in first 3 dc, ch 3, 2 dc in ch 2 sp, ch 2, 3 dc in same ch 2 sp, *3 dc in ch 2 sp, ch 2, 3 dc in same ch 2 sp, ch 1* repeat between *’s around. (19 ‘fans’ total)
Rnd 3: sl st in first 3 dc, ch 3, 2 dc in ch 2 sp, ch 2, 3 dc in same ch 2 sp, *3 dc in ch 2 sp, ch 2, 3 dc in same ch 2 sp, 1 dc in ch 1 sp, ch 1, 1 dc in same ch 1 sp* repeat *’d section 17 more times, 3 dc in ch 2 sp, ch 2, 3 dc in same ch 2 sp. (all but the base of the pineapple should have ‘V’ sections between the ‘fans’); sl st in next 3 dc, bind off.
Rnd 4: Starting in the middle of the 3rd ‘fan’ from the base (where you just ended the last row) we’ll start this row.
Ch 2, 2dc, ch 3, 1 sc in middle of V, ch 1, 3 dc in ch 2 sp, ch 2, 3 dc in same ch 2 sp, *1 dc, 1 ch, 1 dc in center of V, 3 dc, ch 2, 3 dc in center of fan* repeat *’d section ending with ‘half fan’ in appropriate spot on other side.
Rnd 5: just as rnd 4, only 3 dc in first and last half fans.
Rnd 6: 3 sc, ch 2, 1 sc in ch section before fan, {ch 1 *1 dc, 1 picot* repeat 6 times, then 1 sc in V} repeat what’s in brackets around to last half fan, ch 2 from last sc, 3 sc in half fan. Bind off.
Tidy up your ends. The hard part is done.
Eyes (make 2)
1: With Black: Make a Magic Circle. Ch 3, 14 dc around, sl st to join and bind off.
2: With Eye Color: 2 dc in ea dc around. (30 dc total). join w sl st
3: 2dc in one, 1 dc in one all the way around (45 dc total) join w sl st and bind off.
4: With Black: 2 dc in, 1 dc in 1 x3 all the way around. sl st and bind off.
With Black: Join the eyes with 10 sc. I think. There needs to be a small space between them while they’re solidly joined. It looks weird if they’re joined the normal way.
With C2:
dc around the eyes. I suggest 3 dc then 2 dc in 1 dc. follow the pictures, it’s hard to explain. I may revise this section for my own personal reasons.
The Beak:
So, in the picture she starts with 12 stitches at the ‘top’ of the eyes and somehow used dc’s to decrease and it looks solid. Even with my tight tension, I had holes all over the place. so I switched to sc and it worked a lot easier. Just wing it. so long as it’s a triangle and it’s solid it’s all good.
The Brow:
start in the crotch opposite the beak. sl st up the side then do recommended dcs, sl st to join (obviously)
1: 3 sl st, 4 dc
2: 3 sl st, 7 dc
3:3 sl st, 15 dc
The Ears:
Count 14 dc from brow section, this is the outside stitch of the ear.
the ear starts with 9 dc and decreases down by skipping each dc on the edges (9, 7, 5, 3, 1). Don’t really know how to explain this either.
Attach that cute little face to that cute little body and you’re done. It’s a lot easier than it looks.
Tutorial to make a beautiful piece
If you are thinking of venturing into the universe of crochet rugs for the bathroom, know that you are in the right place to learn. We have a very simple model of a rug to stand in front of the toilet.
This model can be made with only one color, or you can match other thread’s colors to bring color to this room. To make it, you will need twine and a crochet hook – D.
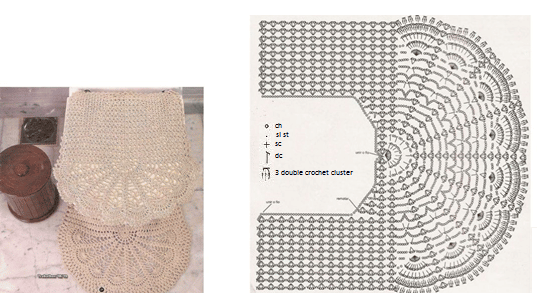
The stitches used for this work are the chain stitch represented in the chart by a ball, the slip stitch represented by a stitch, the double crochet represented by a letter T, and the popcorn stitch represented by 3 T together and with a risk in the middle of each.
On the popcorn stitch, this stitch is composed of 3 double crochet stitches cluster.
Following the step by step of our chart, you will manage to create not only this one but other diverse crochet rugs for the bathroom. Thus, your bathroom will become even more beautiful.
