

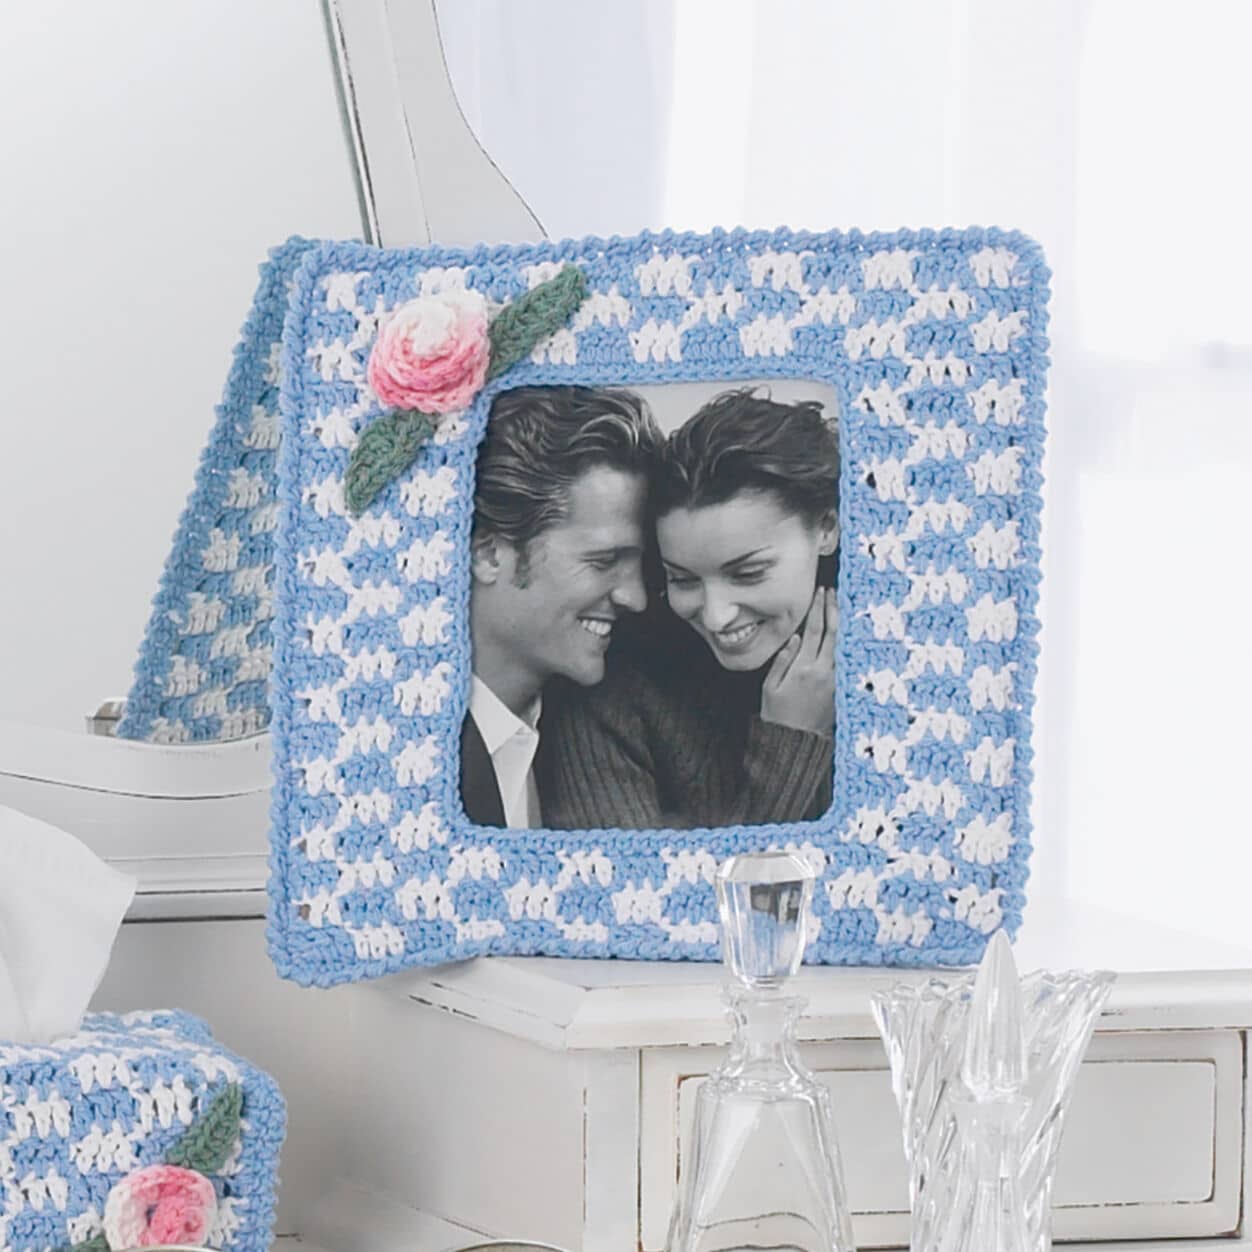
It’s a cherished keepsake when you make this picture frame with a special moment in mind – whether in your life, or that of someone close. Easily crochet to fit a 5″ x 7″ photo, using Lily Sugar’n Cream in sentimental shades that hold meaning for you. What memory do you want to capture and display with warmth?
LILY SUGAR’N CREAM PICTURE FRAME (TO CROCHET) Approx 9 x 11 ins [23 x 28 cm], to fit 5 x 7 ins [12.5 x 18 cm] photo.
MATERIALS
Lily Sugar ’n Cream (70.9 g/2.5 oz)
Main color (MC) (Blue): 1 ball Contrast A (White): 1 ball Contrast C (Green): 1 ball
Lily Sugar ’n Cream Ombres (56.7 g/2 oz) Contrast B (Pink): 1 ball
Size 3.5 mm (U.S. E or 4) crochet hook or size needed to obtain gauge. Approx 9 ins [23.5 cm] square piece of cardboard. GAUGE 18 dc and 7 rows = 4 ins [10 cm].
INSTRUCTIONS
Note: When changing colors, work to last 2 loops on hook of last st, then draw new color through rem 2 loops and proceed. When color is not in use, hold it across previous row and work over it.
FRONT
With MC, ch 41.
1st row: (RS). 1 dc in 4th ch from hook. 1 dc in next ch. *With A, 1 dc in each of next 3 ch. With MC, 1 dc in each of next 3 ch. Rep from * to end of ch, joining A in last dc. 39 dc. Turn.
2nd row: With A, ch 3. Miss first dc. 1 dc in each of next 2 dc. *With MC, 1 dc in each of next 3 dc. With A, 1 dc in each of next 3 dc. Rep from * to end of row, joining MC in last dc. Turn.
3rd row: With MC, ch 3. Miss first dc. 1 dc in each of next 2 dc. *With A, 1 dc in each of next 3 dc. With MC, 1 dc in each of next 3 dc. Rep from * to end of row, joining A in last dc. Turn. Last 2 rows form check pat.
Divide sides: Next row: (WS). With A, ch 3. Miss first dc. 1 dc in each of next 2 dc. With MC, 1 dc in each of next 3 dc. With A, 1 dc in each of next 3 dc, joining MC in last dc. Turn. Leave rem sts unworked. Work a further 12 rows in check pat over these 9 dc. Fasten off. With WS of work facing, miss center 21 dc. Join A with sl st to next dc. Ch 3. 1 dc in each of next 2 dc. With MC, 1 dc in each of next 3 dc. With A, 1 dc in each of last 3 dc, joining MC in last dc. Turn. Work a further 12 rows in check pat over these 9 dc.
Joining row: (RS). Work check pat across first 9 dc. With MC, ch 21. Work check pat across 9 dc from other side.
Next row: Work check pat across 9 dc, 21 ch and 9 dc. 39 dc. Turn. Work a further 2 rows in check pat. Fasten off.
Edging: With RS of work facing, join MC with sl st to any inside corner of Front. Ch 1. Work 1 row of sc evenly around inner edge. Join with sl st to first sc. Fasten off.
BACK
With MC, ch 41.
1st row: (RS). 1 dc in 4th ch from hook. 1 dc in next ch and each ch to end of ch. 39 dc. Turn.
2nd row: Ch 3. Miss first dc. 1 dc in each dc to end of row. Turn. Rep last row 17 times more (19 rows in total). Fasten off.
Join Front and Back: Place markers on bottom edge of Back 1½ ins [4 cm] from corners. With WS of Front and Back facing each other, join MC with sl st at right bottom marker through all thicknesses. Work 1 rnd of sc through all thicknesses to join Front and Back to other marker (leaving on opening across bottom edge to insert photo).
Next rnd: Ch 1. Working from left to right, instead of from right to left as usual, work 1 reverse sc in each sc around. Join with sl st to first sc. Fasten off. Cut cardboard to fit and insert between Front and Back.
ROSE
(make 1) With B, ch 16.
1st row: (RS). 2 dc in 4th ch from hook. 3 dc in each ch to end of ch. Fasten off. Coil rose to form rosebud and sew to inner corner of Front as illustrated.
LEAF (make 2) With C, ch 8.
1st row: (RS). 1 sc in 2nd ch from hook. 1 hdc in next ch. 1 dc in each of next 3 ch. 1 hdc in next ch. 1 sc in last ch. Fasten off. Sew 1 Leaf to each side of Rose as shown in picture.
