
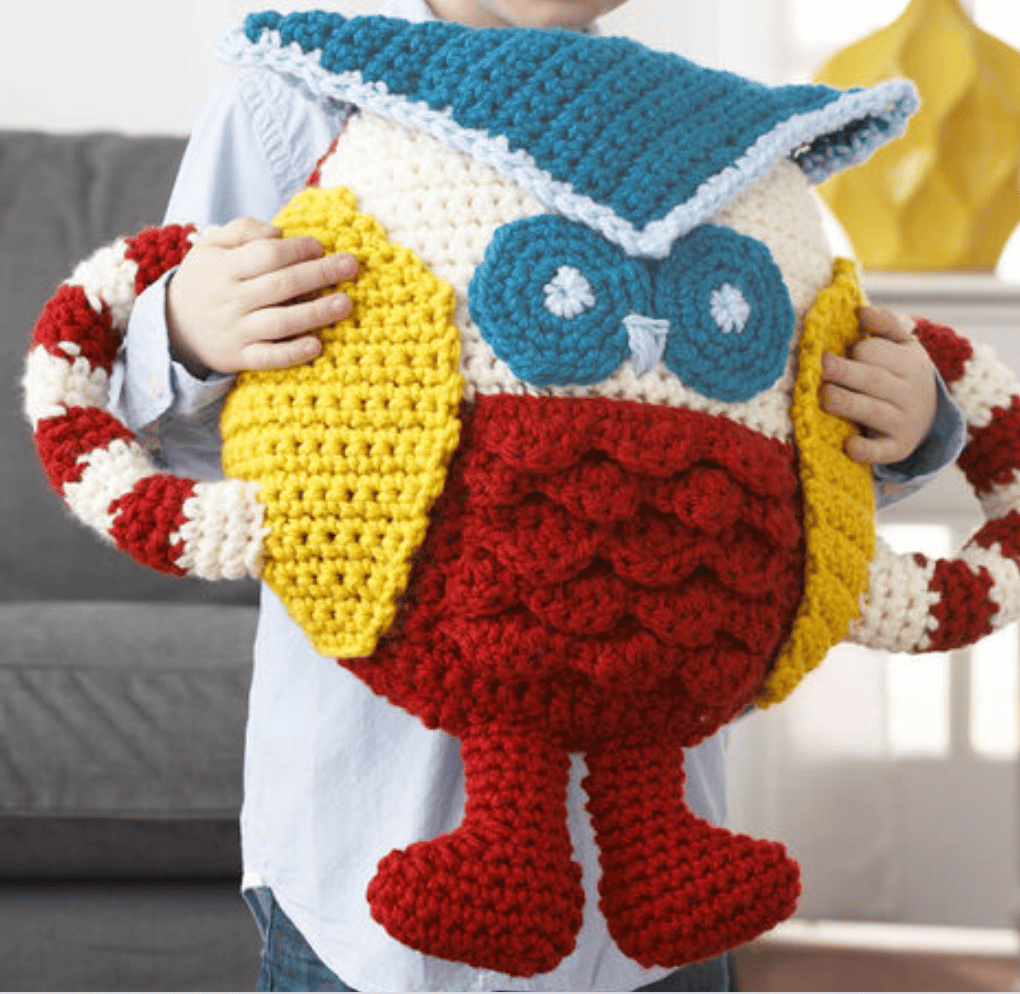
Hey, this huggable owl softee pillow will make any kid very happy, so today lets learn how to make one!!
SUPPLIES & TOOLS:
- Bernat Softee Chunky (3.5 oz;108 yds)
- Main Color (MC) (Berry Red) 3 balls
- Contrast A (Natural) 1 ball
- Contrast B (Baby Yellow) 1 ball
- Contrast C (Hot Blue) 1 ball
- Contrast D (Baby Blue) 1 ball
- Size U.S. L or 11 crochet hook or size needed to obtain gauge
- Two pieces of fabric 18″ square for pillow form
- Stuffing
- Scissors
- Ruler
DIRECTIONS:
MEASUREMENTS
Approx 16″ diameter, excluding arms and legs.
GAUGE
8 sc and 9 rows = 4″
Note: When joining colors, work to last 2 loops on hook of first color. Draw new color through last 2 loops and proceed. Ch 3 at beg of rnd counts as dc throughout.
PILLOW FRONT.
With MC ch 13.
1st row: (RS). 1 sc in 2nd ch from hook. 1 sc in each ch across. Turn. 12 sc.
2nd to 7th rows: Ch 1. 2 sc in first sc. 1 sc in each sc to last sc. 2 sc in last sc. Turn. 24 sc at end of 7th row.
8th, 10th,12th and 14th rows: Ch 1. 1 sc in each sc across. Turn.
9th, 11th, 13th and 15th rows: As 2nd row. Join A at end of 15th row. 32 sc.
16th to 22nd rows: With A, as 8th row.
23rd, 25th, 27th and 29th rows: Ch 1. Draw up a loop in each of next 2 sc. Yoh and draw through all loops on hook – sc2tog made. 1 sc in each sc to last 2 sc. Sc2tog. Turn. 24 sc at end of 29th row.
24th, 26th, 28th and 30th rows: As 8th row.
31st to 36th rows: As 23rd row. 12 sc at end of 36th row.
Fasten off.
PILLOW BACK
With MC, work as for Pillow Front, omitting all references to color changes.
WINGS (make 2).
With B and beg at bottom of Wing, ch 5.
1st row: (RS). 1 sc in 2nd ch from hook. 1 sc in each ch across. Turn. 4 sc.
2nd row: Ch 1. 2 sc in first sc. 1 sc in each of next 2 sc. 2 sc in last sc. Turn. 6 sc.
3rd row: Ch 1. 1 sc in each sc across. Turn.
4th row: Ch 1. 2 sc in first sc. 1 sc in each sc to last sc. 2 sc in last sc. Turn. 8 sc.
5th to 12th rows: Rep last 2 rows 4 times more. 16 sc.
13th to 17th rows: As 3rd row.
18th to 23rd rows: Ch 1. Sc2tog. 1 sc in each sc to last 2 sc. Sc2tog. Turn. 4 sts at end of 23rd row.
24th row: Ch 1. (Sc2tog) twice. Fasten off. 2 sts.
FEATHERS A (make 3).
With MC, ch 14.
1st row: 1 sc in 2nd ch from hook. 1 sc in each ch across. Turn. 13 sc.
2nd row: Sl st in first sc. (1 sc in next sc. 3 dc in next sc. 1 sc in next sc. Sl st in next sc) 3 times. Fasten off.
FEATHERS B (make 2).
With MC, ch 14.
1st row: (RS). 1 sc in 2nd ch from hook. 1 sc in each ch across. Turn. 13 sc.
2nd row: Ch 3. 1 dc in first sc. 1 sc in next sc. Sl st in next sc. (1 sc in next sc. 3 dc in next sc. 1 sc in next sc. Sl st in next sc) twice. 1 sc in next sc. 2 dc in last sc. Fasten off.
HEAD PIECE (make 1).
With C, ch 21.
1st row: (RS). 1 sc in 2nd ch from hook. 1 sc in each ch across. Turn. 20 sc.
2nd row: Ch 1. 1 sc in each sc across. Turn.
Rep 2nd row until work from beg measures 10″.
Fasten off.
Edging: 1st rnd: (RS). Join D with sl st in any corner st. Ch 1. 3 sc in same sp as last sl st. (Work 1 sc in each sc or row end to next corner st. 3 sc in next corner st) 3 times. Work 1 sc in each sc or row end to first corner. Join with sl st to first sc.
Fasten off.
EYES (make 2).
With C, ch 2.
1st rnd: 6 sc in 2nd ch from hook. Join with sl st to first sc.
2nd rnd: Ch 1. 2 sc each sc around. Join with sl st to first sc. 12 sc.
3rd rnd: Ch 1. (1 sc in next sc. 2 sc in next sc) 6 times. Join with sl st to first sc. 18 sc.
4th rnd: Ch 1. (1 sc in each of next 2 sc. 2 sc in next sc) 6 times. Join with sl st to first sc. 24 sc. Fasten off.
ARMS (make 2).
Stripe Pat
With A, work 3 rnds.
With MC, work 3 rnds.
These 6 rnds form Stripe Pat.
With C, ch 10. Join with sl st in first ch to form a ring.
1st rnd: Ch 1. 1 sc in each ch around. Join with sl st to first sc. 10 sc.
2nd rnd: Ch 1. 1 sc in each sc around. Join with sl st to first sc.
Keeping cont of Stripe Pat, rep 2nd rnd until work from beg measures 11″ [28 cm]. Fasten off.
Lightly stuff.
LEGS (make 2).
With MC, ch 7.
1st rnd: 1 sc in 2nd ch from hook. 1 sc in each of next 4 ch. 3 sc in last ch. Working into opposite side of foundation ch, 1 sc in each of next 4 ch. 2 sc in last ch. Join with sl st to first sc. 14 sc.
2nd rnd: Ch 1. 2 sc in first sc. 1 sc in each of next 4 sc. 2 sc in each of next 3 sc. 1 sc in each of next 4 sc. 2 sc in each of next 2 sc. Join with sl st to first sc. 20 sc.
3rd rnd: Ch 1. 1 sc in each sc around. Join with sl st to first sc.
4th rnd: Ch 1. 1 sc in each of next 6 sc. (Sc2tog) 3 times. 1 sc in each of next 8 sc. Join with sl st to first sc. 17 sts.
5th rnd: Ch 1. 1 sc in each of next 5 sc. Sc2tog. 1 sc in next st. Sc2tog. 1 sc in each of next 7 sc. Join with sl st to first sc. 15 sts.
6th rnd: Ch 1. 1 sc in each of next 4 sc. Sc2tog. 1 sc in next sc. Sc2tog. 1 sc in each of next 4 sc. Sc2tog. Join with sl st to first sc. 12 sts.
7th rnd: Ch 1. 1 sc in each of next 3 sc. Sc2tog. 1 sc in next sc. Sc2tog. 1 sc in each of next 4 sts. Join with sl st to first sc. 10 sts.
Stuff foot.
8th to 12th rnds: Ch 1. 1 sc in each sc around. Join with sl st to first sc. Fasten off after last rnd. Finish stuffing.
FINISHING
Pillow form: Cut two 17″ diameter circles from fabric pieces. With RS of circle pieces tog and using a ½” seam allowance, sew pieces tog leaving a 4″ opening. Stuff pillow form. Sew opening closed.
Sew Front and Back tog leaving large enough opening to slide pillow form in. Insert pillow form. Sew rem opening closed.
Sew Wings, Headpiece, Eyes, Arms and Legs to Pillow as shown in picture. Alternating Feathers A and B, sew to Pillow as shown in picture. With D, embroider eyes and beak to face as shown in picture.
ABBREVIATIONS
Approx = Approximately.
Beg = Beginning.
Ch(s) = Chain(s).
Cont = Continue(ity).
Dc = Double crochet.
Pat = Pattern.
Rem = Remain(ing).
Rep = Repeat.
RS = Right side.
Rnd(s) = Round(s).
Sc = Single crochet.
Sl st = Slip stitch.
Sp(s) = Space(s).
St(s) = Stitch(es).
Tog = Together.
Yoh = Yarn over hook.
Comment, and share with your friends!!
Come back for more!
