
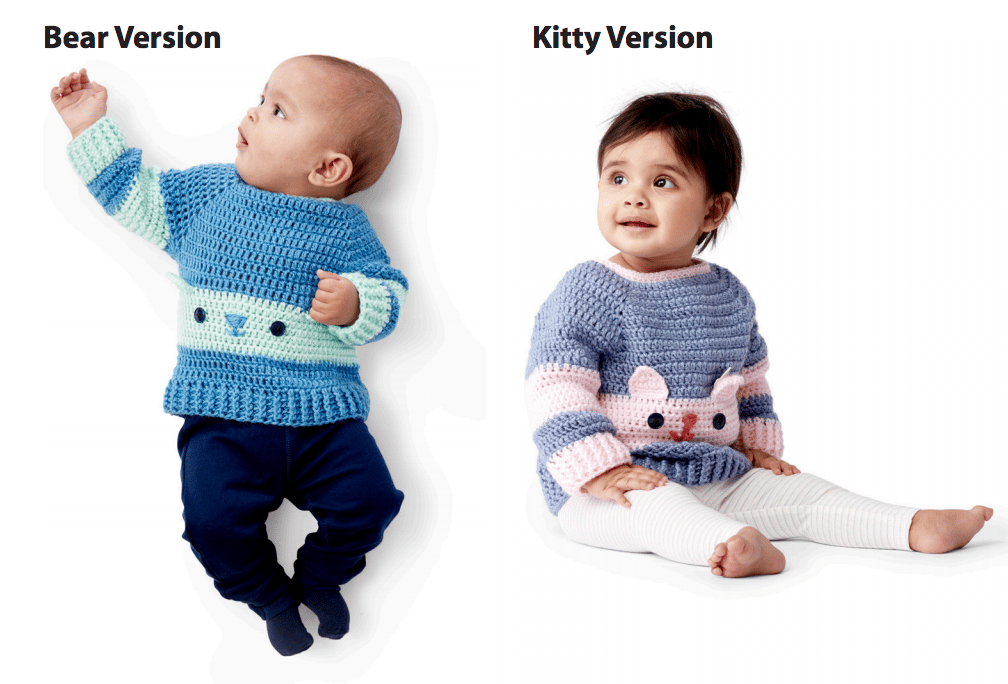
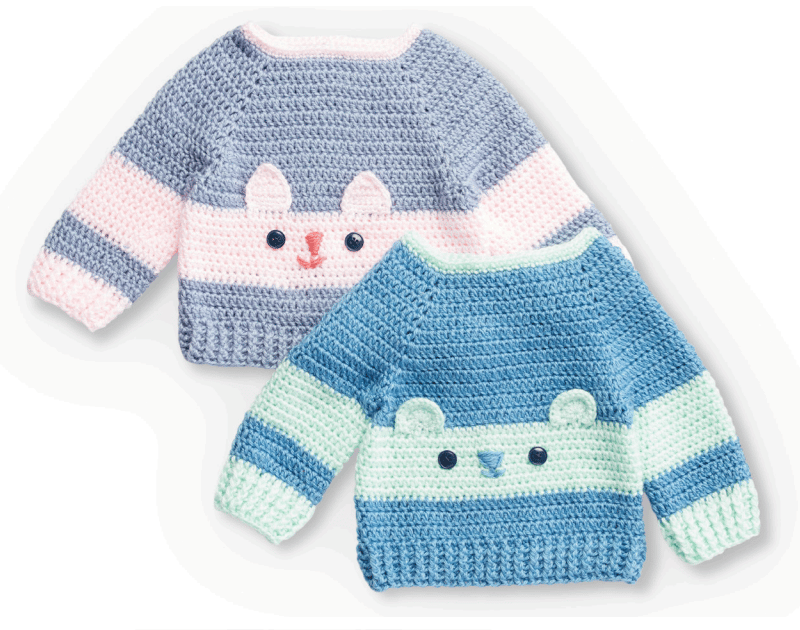
These crocheted sweaters look great worked up in Bernat Softee Baby! With this yarn’s light sheen and beautiful color selection these sweaters are sure to be keepsakes. This crochet pattern works up quickly using double crochet and half double crochet stitches, in a simple top down construction meaning there are no seams to sew and less ends to weave in!
MATERIALS
Bernat Softee Baby (5 oz/140 g; 362 yds/331 m) Sizes 6, 12, 18, 24 mos
Kitty Version Contrast A Mauve (30310) 1, 2, 2, 3 ball(s)
Contrast B Pink (02001) 1, 1, 1, 1 ball Bear Version
Contrast A Blue Jeans (30111) 1, 2, 2, 3 ball(s)
Contrast B Mint (02004) 1, 1, 1, 1 ball Sizes U.S. E/4 (3.5 mm) and U.S. G/6 (4 mm)
crochet hooks or size needed to obtain gauge. 2 buttons for eyes. Kitty Version only: Small amount of dark pink worsted weight yarn for nose and mouth embroidery.
GAUGE
16 sc and 19 rows = 4″ [10 cm] with larger hook.
INSTRUCTIONS
The instructions are written for smallest size. If changes are necessary for larger size(s) the instructions will be written thus ( ). Numbers for each size are shown in the same color throughout the pattern. When only one number is given in black, it applies to all sizes.
Note:
Sweater is worked in one piece from neck edge down. Ch 3 at beg of rnd counts as dc. Ch 2 at beg of rnd counts as hdc. To change colors, work to last loops on hook of stitch. Draw new color through last loops and proceed with new color.
BODY
With larger hook and A, beg at neck edge, ch 56 (60-64-68) loosely (foundation ch needs to pull over baby’s head). Join with sl st to first ch, taking care not to twist ch.
1st rnd: Ch 3. 1 dc in each of next 7 (8-9-10) ch. (1 dc. Ch 1. 1 dc – V-st made) in next ch. 1 dc in each of next 10 ch. V-st in next ch. 1 dc in each of next 16 (18-20-22) ch. V-st in next ch. 1 dc in each of next 10 ch. V-st in next ch. 1 dc in each of last 8 (9-10-11) ch. Join with sl st to top of ch 3. 2nd to 9th (10th-11th-12th) rnds: Ch 3. *1 dc in each dc to ch-1 sp of next V-st. V-st in ch-1 sp of next V-st. Rep from * 3 times more. 1 dc in each dc to end of rnd. Join. 124 (136-148-160) dc and 4 ch-1 sps at end of 9th (10th-11th-12th) rnd.
Divide Sleeves and Body:
1st rnd: Ch 3. 1 dc in each of next 16 (18-20-22) dc. 1 dc in ch-1 sp of next V-st. Ch 3 for underarm. Skip next 28 (30-32-34) dc. 1 dc in ch-1 sp of next V-st. 1 dc in each of next 34 (38-42-46) dc. 1 dc in ch-1 sp of next V-st. Ch 3 for underarm. Skip next 28 (30-32- 34) dc. 1 dc in ch-1 sp of next V-st. 1 dc in each of last 17(19-21- 23) dc. Join with sl st to top of ch 3.
2nd rnd: Ch 3. 1 dc in each dc or ch around. Break A, join B with sl st to top of ch 3. 78 (86-94- 102) dc.
3rd rnd: With B, ch 2 (counts as hdc here and throughout). 1 hdc in each dc around. Join with sl st to top of ch 2.
4th rnd: Ch 2. 1 hdc in each hdc around. Join with sl st to top of ch 2. Rep last rnd until section worked in B measures 2½ (3-3-4)” [6 (7.5- 7.5-10) cm]. Break B, join A.
Next rnd: With A, ch 3. 1 dc in each hdc around. Join with sl st to top of ch 3.
Next rnd: Ch 3. 1 dc in each dc around. Join with sl st to top of ch 3. Rep last rnd until work from underarm measures 4½ (5½-5½- 6)” [11.5 (14-14-15) cm]. Ribbing:
1st rnd: Ch 2. *Dcbp around post of next st. Dcfp around post of next st. Rep from * to last st. Dcbp around post of last st. Join with sl st to top of ch 2. Rep last rnd 4 (5-5-6) times more. Fasten off at end of last rnd.
SLEEVES
1st rnd: (RS). With larger hook, join A with sl st to center of underarm ch. Ch 3. 1 dc in each ch or dc around. Join with sl st to top of ch 3. 31 (35-39-43) dc.
2nd rnd: Ch 3. 1 dc in each dc around. Break A, join B with sl st to top of ch 3.
3rd rnd: With B, ch 2. 1 hdc in each dc around. Join with sl st to top of ch 2.
4th rnd: Ch 2. 1 hdc in each hdc around. Join with sl st to top of ch 2. Rep last rnd until section worked in B measures 2½ (3-3-4)” [6 (7.5- 7.5-10) cm]. Break B, join A with sl st to top of ch 2. Next rnd: With A, ch 3. 1 dc in each hdc around. Join with sl st to top of ch 3.
Next rnd: Ch 3. 1 dc in each dc around. Join with sl st to top of ch 3. Rep last rnd until work from underarm chain measures 4 (5- 5½-6)” [10 (12.5-14-15) cm].
Next rnd: Ch 3. 1 dc in each of next 15 dc. Dc2tog. 1 dc in each dc to end of rnd. Break A, join B with sl st to top of ch 3. 30 (34- 38-42) dc.
Sleeve Ribbing: 1st rnd: With B, ch 2 (counts as first st). *Dcbp around post of next st. Dcfp around post of next st. Rep from * to last st. Dcbp around post of last st. Join with sl st to top of ch 2. Rep last rnd 4 (5-5-6) times more. Fasten off at end of last rnd.
Neck edging: 1st rnd: Join B with sl st in center back rem ch of foundation ch. Ch 1. Work 1 sc in each rem ch around. Join with sl st to first sc. 2nd rnd: Ch 1. 1 sc in each sc around. Join with sl st to first sc. Fasten off.
FINISHING KITTY VERSION Ears (make 2) With smaller hook and B, ch 8.
1st row: 1 sc in 2nd ch from hook. 1 sc in each ch to end of ch. Turn. 7 sc.
2nd row: Ch 1. 1 sc in each sc to end of row. Turn.
3rd row: Ch 1. Sc2tog. 1 sc in each of next 3 sc. Sc2tog. Turn. 5 sts.
4th row: Ch 1. Sc2tog. 1 sc in next sc. Sc2tog. Turn. 3 sts.
5th row: Ch 1. Sc3tog. Do not turn. Ch 1. Work 1 rnd of sc evenly around edges of Ear, having 3 sc in each corner. Join with sl st to first sc. Fasten off.
BEAR VERSION
Ears (make 2) With smaller hook and B, ch 4.
1st row: 7 dc in 4th ch from hook (ch 3 counts as dc). 8 dc.
2nd row: Ch 2 (counts as hdc). 1 hdc in first dc. 2 hdc in each dc to end of row. Fasten off. 16 hdc.
BOTH VERSIONS
Attach Ears along top edge of contrast band of B on Front of sweater, making sure they are evenly spaced on each side edge. Sew buttons for eyes as shown in picture. Using A for Bear Version or dark pink worsted weight yarn for Kitty Version, embroider nose and mouth.
PATTERN CARE
Treat your finished project right! Make sure you read the care directions closely so your hard work ages gracefully.
- Do Not Bleach
- Do Not Dry Clean
- Do Not Iron
- Machine Wash in Cool Water
- Dry Flat
