
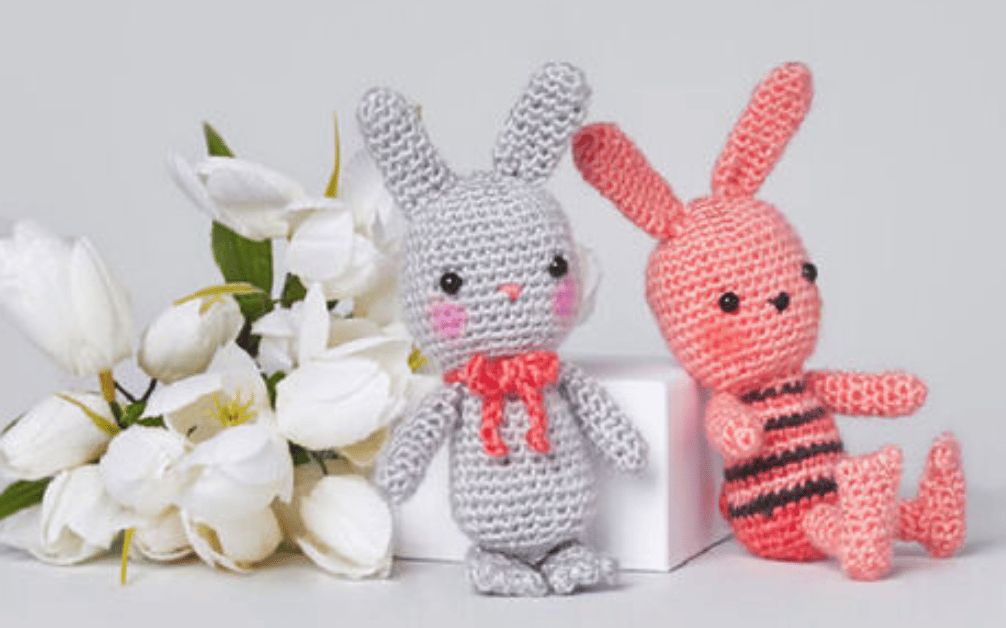
This loving bunny couple enjoys cuddling. So we won’t be surprised if they soon multiply into a whole family of bunnies. Enjoy this tutorial!!
Tools & Supplies
RED HEART® Amigurumi: 1 ball 9741 Flamingo
Susan Bates® Crochet Hook: 2.75 mm [US C-2] Stitch marker, stuffing, four 6mm safety eyes (two for each bunny), yarn needle, black and pink embroidery floss and embroidery needle for nose. Optional: Knee high stockings and plastic pellets for weighted stuffing, dark pink powder face blusher and cotton swabs for cheek detail
GAUGE: 32 sts = 4″ [10 cm]; 28 rounds = 4″ [10 cm] in single crochet (sc). EXACT GAUGE IS NOT CRITICAL TO THIS PROJECT. Use any size hook to obtain the gauge.
RED HEART® Amigurumi, Art E885 available in 3.5 oz (100 g) 239 yds (219m) cakes
Solid Bunny measures about 5¼” [13.5 cm], standing.
Striped Bunny measures about 5½” [14 cm], seated.
Special Stitch sc2tog (single crochet 2 stitches together) = [Insert hook in next stitch, yarn over and pull up a loop] twice, yarn over and draw through all 3 loops on hook.
Notes . Bunny is designed in two versions: a solid standing bunny and a striped seated bunny. Solid bunny is made from 9 pieces: Head, body, 2 arms, 2 ears, 2 feet, and bow tie. Striped bunny is made from 10 pieces: Head, body, 2 arms, 2 ears, 2 feet, and 2 legs. Pieces are sewn together using yarn tails or yarn scraps. Before beginning, separate the different color sections of the yarn as follows: Pop the center color out by pushing gently on the center of the ball so that it comes out intact. Find the point where the color changes and cut the yarn. Repeat this process for the remaining yarn colors by carefully pushing the rings of color out of the larger ring and cutting. Roll each color into a separate ball to prevent tangling. In the pattern instructions, the light pink color is referred to as A, the grey as B, the bright pink as C, and the black as D. 6. To change yarn color, work last stitch of old color to last yarn over. Yarn over with new color and draw through all loops on hook to complete stitch. Proceed with new color. Do not fasten off old color until instructed. Carry colors not in use up inside of piece when next needed. Do not use safety eyes if toy is intended for a child 2 years of age or younger. Tip: If washers are too tight to snap onto post, hold them with tweezers and heat with hair dryer for about 15 seconds.
Special Technique Adjustable ring = Wrap yarn into a ring, ensuring that the tail falls behind the working yarn. Grip ring and tail between middle finger and thumb. Insert hook through center of ring, yarn over (with working yarn) and draw up a loop. Work stitches of first round in the ring. After the first round of stitches is worked, pull gently on tail to tighten ring.
HEAD Note: If making striped bunny, use yarn color A. If making solid bunny, use yarn color B. Beginning at top of head, make an adjustable ring. Round 1 (right side): Work 6 sc in ring; do not join, work in continuous rounds (spiral)—6 sc. Place a marker in the last sc worked to indicate end of round. Move marker up as each round is completed. Round 2: Work 2 sc in each of next 6 sts—12 sc. Round 3: [Sc in next st, 2 sc in next st] 6 times—18 sc. Round 4: [Sc in next 2 sts, 2 sc in next st] 6 times—24 sc. Round 5: [Sc in next 3 sts, 2 sc in next st] 6 times—30 sc. Round 6: [Sc in next 4 sts, 2 sc in next st] 6 times—36 sc. Rounds 7–14: Sc in each st around. Round 15: [Sc in next 4 sts, sc2tog] 6 times—30 sc. Round 16: Sc in each st around. Round 17: [Sc in next 3 sts, sc2tog] 6 times—24 sc. Attach safety eyes between Rounds 11 and 12, about 6 stitches apart. Begin stuffing head and continue stuffing as work progresses. Do not use weighted stuffing in head. Round 18: Sc in each st around. Round 19: [Sc in next 2 sts, sc2tog] 6 times—18 sc. Round 20 (neck): [Sc in next st, sc2tog] 6 times—12 sc. Fasten off leaving a long tail for sewing head to body. If needed, thread beginning yarn tail through stitches at beginning of piece and pull to close opening. Weave in and trim beginning tail only. Do not close opening at neck.
SOLID BUNNY BODY Beginning at neck with B, make an adjustable ring. Round 1 (right side): Work 6 sc in ring; do not join, work in continuous rounds (spiral)—6 sc. Place a marker in the last sc worked to indicate end of round. Move marker up as each round is completed. Round 2: Work 2 sc in each of next 6 sts—12 sc. Rounds 3 and 4: Sc in each st around. Round 5: [Sc in next st, 2 sc in next st] 6 times—18 sc. Round 6: [Sc in next 2 sts, 2 sc in next st] 6 times—24 sc. Rounds 7–11: Sc in each st around. Round 12: [Sc in next 3 sts, 2 sc in next st] 6 times—30 sc. Rounds 13–15: Sc in each st around. Begin stuffing piece and continue stuffing as work progresses. Round 16: [Sc in next st, sc2tog] 10 times—20 sc. Place optional knee high, filled with plastic pellets, into piece. Round 17: Sc in each st around. Round 18: [Sc in next 2 sts, sc2tog] 5 times—15 sc. Round 19: [Sc in next st, sc2tog] 5 times—10 sc. Fasten off. Weave in and trim tails.
STRIPED BUNNY BODY Beginning at neck with A, make an adjustable ring. Round 1 (right side): Work 6 sc in ring; do not join, work in continuous rounds (spiral)—6 sc. Place a marker in the last sc worked to indicate end of round. Move marker up as each round is completed. Round 2: Work 2 sc in each of next 6 sts—12 sc. Rounds 3 and 4: Sc in each st around, change to D in last sc of Round 4. Do not cut A until instructed. Carry A inside piece. Round 5: With D, sc in each st around and change to C in last sc made. Do not cut D until instructed. Carry D inside piece. Round 6: With C, [sc in next st, 2 sc in next st] 6 times and change to A in last sc made—18 sc. Do not cut C until instructed. Carry C inside piece. Round 7: With A, [sc in next 2 sts, 2 sc in next st] 6 times and change to D in last sc made—24 sc. Round 8: With D, sc in each st around and change to C in last sc made. Round 9: With C, sc in each st around and change to A in last sc made. Round 10: With A, sc in each st around and change to D in last sc made. Rounds 11 and 12: Repeat Rounds 8 and 9. Round 13: With A, [sc in next 3 sts, 2 sc in next st] 6 times and change to D in last sc made—30 sc. Fasten off A. Round 14: With D, sc in each st around and change to C in last sc made. Begin stuffing piece and continue stuffing as work progresses. Fasten off D. Work all remaining rounds with C only. Rounds 15 and 16: Sc in each st around. Round 17: [Sc in next st, sc2tog] 10 times—20 sc. Place optional knee high, filled with plastic pellets, into piece. Round 18: Sc in each st around. Round 19: [Sc in next 2 sts, sc2tog] 5 times—15 sc. Round 20: [Sc in next st, sc2tog] 5 times—10 sc. Fasten off. Weave in and trim tails.
ARMS (make 2 for each bunny) Note: If making striped bunny, use yarn color A. If making solid bunny, use yarn color B. Make an adjustable ring. Round 1 (right side): Work 6 sc in ring; do not join, work in continuous rounds (spiral)—6 sc. Place a marker in the last sc worked to indicate end of round. Move marker up as each round is completed. Rounds 2–10: Sc in each st around. Fasten off, leaving a long tail. If needed, thread beginning yarn tail through stitches at beginning of piece and pull to close opening. Weave in and trim beginning tail. Stuff arm lightly. Do not trim ending tail. It can be used later for sewing arm to body.
FEET (make 2 for each bunny) Note: If making striped bunny, use yarn color A. If making solid bunny, use yarn color B. Make an adjustable ring. Round 1 (right side): Work 6 sc in ring; do not join, work in continuous rounds (spiral)—6 sc. Place a marker in the last sc worked to indicate end of round. Move marker up as each round is completed. Round 2: [Sc in next st, 2 sc in next st] 3 times—9 sc. Rounds 3–8: Sc in each st around. Round 9: [Sc in next st, 2 sc in next st] 4 times, sc in last st—13 sc. Do not fasten off. Stuff lightly.
Seaming Row: Hold top edges together, working through both thicknesses and inserting hook into inner loops only, slip st in each st across and into last st. Fasten off, leaving a long tail.
Make Toes: Thread the ending tail onto needle and use it to form toes as follows: Insert needle through inside of foot, coming out at top of foot about 3 rounds from seaming row (toe edge). Take needle over toe edge then insert needle into bottom of foot immediately below top insertion point. Bring needle through inside of foot and out the top of the foot about 2 stitches to the side of the insertion point. Take needle over toe edge again then insert needle into bottom of foot immediately below top insertion point. Bring needle through inside of foot to back of foot and out at heel. Make a few small stitches at heel to secure, then knot end and take it back inside foot to hide end.
STRIPED BUNNY LEGS (make 2) With A, leaving a long beginning tail, make an adjustable ring. Round 1 (right side): Work 6 sc in ring; do not join, work in continuous rounds (spiral)—6 sc. Place a marker in the last sc worked to indicate end of round. Move marker up as each round is completed. Rounds 2–5: Sc in each st around. Fasten off, leaving a long tail for sewing. Use ending yarn tail to sew leg to top of a foot, about 5 rounds from toe edge. Weave in and trim ending tail. Do not trim beginning tail. It can be used later for sewing leg/foot to body.
TAIL Note: If making striped bunny, use yarn color A. If making solid bunny, use yarn color B. Make an adjustable ring. Round 1 (right side): Work 6 sc in ring; do not join, work in continuous rounds (spiral)—6 sc. Place a marker in the last sc worked to indicate end of round. Move marker up as each round is completed. Round 2: [Sc in next st, 2 sc in next st] 3 times—9 sc. Round 3: Sc in each st around. Fasten off, leaving a long tail. If needed, thread beginning yarn tail through stitches at beginning of piece and pull to close opening. Weave in and trim beginning tail. Do not stuff tail. Do not trim ending tail. It can be used later for sewing tail to body.
SOLID BUNNY EARS (make 2) With B, make an adjustable ring. Round 1 (right side): Work 6 sc in ring; do not join, work in continuous rounds (spiral)—6 sc. Place a marker in the last sc worked to indicate end of round. Move marker up as each round is completed. Round 2: [Sc in next st, 2 sc in next st] 3 times—9 sc. Rounds 3–9: Sc in each st around. Fasten off, leaving a long tail. If needed, thread beginning yarn tail through stitches at beginning of piece and pull to close opening. Weave in and trim beginning tail. Do not stuff. Do not trim ending tail. It can be used later for sewing ear to head.
STRIPED BUNNY EARS (make 2) With A, make an adjustable ring. Round 1 (right side): Work 6 sc in ring; do not join, work in continuous rounds (spiral)—6 sc. Place a marker in the last sc worked to indicate end of round. Move marker up as each round is completed. Round 2: [Sc in next st, 2 sc in next st] 3 times—9 sc. Rounds 3–11: Sc in each st around. Fasten off, leaving a long tail. If needed, thread beginning yarn tail through stitches at beginning of piece and pull to close opening. Weave in and trim beginning tail. Do not stuff. Do not trim ending tail. It can be used later for sewing ear to head.
SOLID BUNNY BOW TIE With C, ch 50. Fasten off. Weave in and trim tails.
FINISHING Referring to photograph as a guide to placement, use yarn tails or yarn scraps to sew the following pieces together. Insert body neck into neck opening at bottom of head and sew pieces together, taking care to position eyes facing forward. For solid bunny, sew feet to bottommost portion of body, side by side, taking care that toes are facing forward. For striped bunny, sew leg/feet to front of lower body at about Round 16 and 3 or 4 stitches apart. Sew arms to sides of upper body at round just beneath neck indentation. Sew ears to top of head at Round 2, about 1 stitch apart. Sew tail to lower backside of body. With embroidery needle and pink embroidery floss for solid bunny or black embroidery floss for stiped bunny, embroider a small triangle on face for nose, centered about 1 row below eyes. Weave the floss ends back through head and knot securely then bury yarn in head, trimming excess as needed.

Optional Cheeks: Using cotton swabs, apply powder face blusher to face, as follows: Load swab with blusher, tap to release excess powder. Apply powder in circular rubbing motion to form round cheeks. Apply cheeks about 1 round below eyes and about 4 stitches wide. Tie bow tie around solid bunny’s neck, tying ends into a bow. Weave in and trim any remaining ends.
ABBREVIATIONS
A, B, C, and D = Color A, Color B, Color C, and Color D;
ch = chain;
sc = single crochet;
st(s) = stitch(es);
[ ] = work directions in brackets the number of times specified.
Comment if you like, share with your friends!!
